Wild Savana
This tutorial is solely my own creation, any similarities to another is purely coincidental
Remember to Save Often
Supplies - HERE
Karine_dreams-Lady_Savava_1891 Wild Savanna Bodacious Font
Plugins - Can be found HERE AAA Frames, Foto Frame AB08 Plugin - Wire Meshing Unlimited Penta.com Dot and Cross For the Penta.com plugin go to bottom of page and click Siguiente>> That will take you to page 2 Backgroundmaniac - stripes n more (this is down as Background Mania on the site)
NOTES
Open all tubes and minimize for now Open Bodacious Font and minimize (windows 7 users will need a font viewer) Save all plugins to your plugins folder Before opening PSP Feel free to use your own supplies.
STEP 1
Open a new canvas 600, 450, 200.00 Raster Background, Transparent ticked.
Change Foreground colour to #bc480d and Background colour to #ee8f19
STEP 2
Flood fill your canvas with your foreground colour # bc480d
Effects Plugin AB08 - Wire meshing Unlimited.
6, 8, 4, 4, 53, 32 Apply
Layers, Duplicate,
Effects, Backgroundmaniac - Stripes n more
125, 125, OK
In your layers palette lower the opacity to 40
STEP 3
Select your selections tool, Custom Selection (Highlighted in blue) Top 0, Left 50, Right 150, Bottom 450,
Maximize Wild Savanna image, Edit copy, You can close this now, but don't copy anything else or this will wipe out your image, Edit paste as new layer,
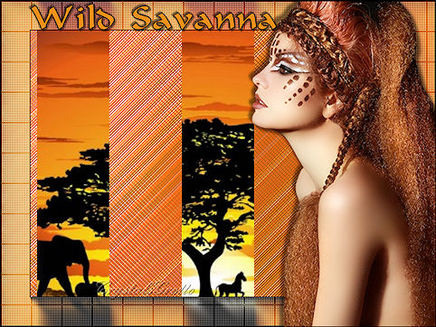
Move this over until you have the image you want in your selection See my image below
I wanted the mother and baby showing on the image, Selections, Invert Hit delete on your keyboard once,
B Select selections tool again, Custom Selection, Leave the top and bottom settings at 0 and 450 Left 250, Right 350,
Edit Paste as new layer, Move image until you have the image you wish in your selection, Selections, Invert Hit delete on your keyboard once,
C Select selections tool again, Custom Selection, Leave the top and bottom setting at 0 and 450 Left 450, Right 550
Edit Paste as new layer, Move image over again until you have the image you want in your selection, Selections Invert Hit delete on your keyboard once.
Selections Select None.
Layers Merge, Merge Visible
STEP 4
Effects, AAA Frames, Foto Frame 40, 0, 0, 0, 0, 0, 0, 100, Default OK
Selections, Select All, Selections Modify, Contract 40 OK
Selections Invert, In your Layers Palette Right click on Merged Layer Select Promote Selection to Layer
Effects, Penta.com, Dot and Cross
128, 38, 1 OK Selections Select None,
STEP 5
Maximize Karine_dreams_Lady_Savava_1891_Aout_2011 Make sure Raster 1 is highlighted Edit copy, You can close this now Edit Paste as new layer
Image, Resize 80%, Smart Size, Resize all layers, Not ticked.
Repeat the resize at 80% Repeat the resize at 90% slide image to the right side as in header image
Effects 3D effects Drop Shadow
5, 5, 50, 5.00, Black
Repeat the drop shadow changing Vertical and Horizontal to -5 (minus)
STEP 6
Change your Foreground colour to black #000000, We've already got our Background Colour in place. Select your text tool
Bodacious, 50, Bold Highlighted, Center, Anti-alias sharp, Stoke 1.0, Vector, Solid Line Style, Type - Wild Savanna - Or text of your choice Move this to the top, so its sitting on the Foto Frame, and over to the left side of the Foto Frame See Header image for placement.
Layers, Convert to Raster Layer Effects, 3D effects, Drop Shadow 2, 2, 50, 2.00 Black
Repeat drop shadow, changing Vertical and Horizontal to -2 (minus)
STEP 7
Layers, Merge, Merge All (flatten) Image,
Add border 1, symmetric, Black OK
Add your watermark as a new layer Layers, Merge, Merge All (flatten) Save as JPEG
Hope you enjoyed this tutorial as much as I did writing it.
Remember to Save Often
Supplies - HERE
Karine_dreams-Lady_Savava_1891 Wild Savanna Bodacious Font
Plugins - Can be found HERE AAA Frames, Foto Frame AB08 Plugin - Wire Meshing Unlimited Penta.com Dot and Cross For the Penta.com plugin go to bottom of page and click Siguiente>> That will take you to page 2 Backgroundmaniac - stripes n more (this is down as Background Mania on the site)
NOTES
Open all tubes and minimize for now Open Bodacious Font and minimize (windows 7 users will need a font viewer) Save all plugins to your plugins folder Before opening PSP Feel free to use your own supplies.
STEP 1
Open a new canvas 600, 450, 200.00 Raster Background, Transparent ticked.
Change Foreground colour to #bc480d and Background colour to #ee8f19
STEP 2
Flood fill your canvas with your foreground colour # bc480d
Effects Plugin AB08 - Wire meshing Unlimited.
6, 8, 4, 4, 53, 32 Apply
Layers, Duplicate,
Effects, Backgroundmaniac - Stripes n more
125, 125, OK
In your layers palette lower the opacity to 40
STEP 3
Select your selections tool, Custom Selection (Highlighted in blue) Top 0, Left 50, Right 150, Bottom 450,
Maximize Wild Savanna image, Edit copy, You can close this now, but don't copy anything else or this will wipe out your image, Edit paste as new layer,
Move this over until you have the image you want in your selection See my image below
I wanted the mother and baby showing on the image, Selections, Invert Hit delete on your keyboard once,
B Select selections tool again, Custom Selection, Leave the top and bottom settings at 0 and 450 Left 250, Right 350,
Edit Paste as new layer, Move image until you have the image you wish in your selection, Selections, Invert Hit delete on your keyboard once,
C Select selections tool again, Custom Selection, Leave the top and bottom setting at 0 and 450 Left 450, Right 550
Edit Paste as new layer, Move image over again until you have the image you want in your selection, Selections Invert Hit delete on your keyboard once.
Selections Select None.
Layers Merge, Merge Visible
STEP 4
Effects, AAA Frames, Foto Frame 40, 0, 0, 0, 0, 0, 0, 100, Default OK
Selections, Select All, Selections Modify, Contract 40 OK
Selections Invert, In your Layers Palette Right click on Merged Layer Select Promote Selection to Layer
Effects, Penta.com, Dot and Cross
128, 38, 1 OK Selections Select None,
STEP 5
Maximize Karine_dreams_Lady_Savava_1891_Aout_2011 Make sure Raster 1 is highlighted Edit copy, You can close this now Edit Paste as new layer
Image, Resize 80%, Smart Size, Resize all layers, Not ticked.
Repeat the resize at 80% Repeat the resize at 90% slide image to the right side as in header image
Effects 3D effects Drop Shadow
5, 5, 50, 5.00, Black
Repeat the drop shadow changing Vertical and Horizontal to -5 (minus)
STEP 6
Change your Foreground colour to black #000000, We've already got our Background Colour in place. Select your text tool
Bodacious, 50, Bold Highlighted, Center, Anti-alias sharp, Stoke 1.0, Vector, Solid Line Style, Type - Wild Savanna - Or text of your choice Move this to the top, so its sitting on the Foto Frame, and over to the left side of the Foto Frame See Header image for placement.
Layers, Convert to Raster Layer Effects, 3D effects, Drop Shadow 2, 2, 50, 2.00 Black
Repeat drop shadow, changing Vertical and Horizontal to -2 (minus)
STEP 7
Layers, Merge, Merge All (flatten) Image,
Add border 1, symmetric, Black OK
Add your watermark as a new layer Layers, Merge, Merge All (flatten) Save as JPEG
Hope you enjoyed this tutorial as much as I did writing it.
