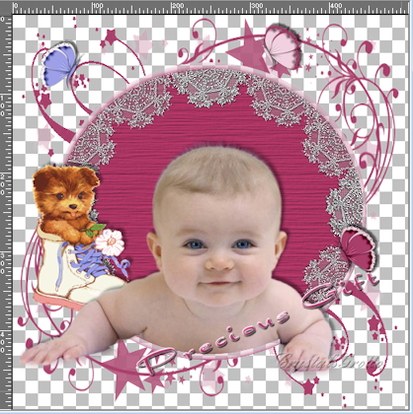
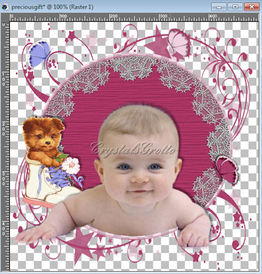
Precious Gift
SUPPLIES - HERE
BabyBlamg,
Grain-Long Texture
Zuzzanna_mask18
Cg-3butterflies-10613-1803
Cg-lacehalo-9613-2244
PupInShoe.tub Dragonfly Font
NOTES
Save zuzzanna-mask 18 to your masks folder
Save Grain-long to your texture folder
Open font in PSP an minimize to your desktop (Windows 7 users will need a font viewer)
Open all tubes in PSP This tutorial is solely my own creation any similarities to another is purely coincidental
I wrote this Tutorial using PSP X2 but any versions should work with some minor adjustments
Save your work often, I save mine as a psp image after opening a new canvas, then just hit Ctrl S after each step
STEP 1 Open a new Canvas

500, 500, 300 Resolution, Raster Background, Transparent ticked
Choose a dark colour, either a pink or blue I used #a83e69
With paint bucket flood fill your canvas
STEP 2
Layers, Load save mask, Load mask from disk, find zuzzanna_mask 18
Choose a dark colour, either a pink or blue I used #a83e69
With paint bucket flood fill your canvas
STEP 2
Layers, Load save mask, Load mask from disk, find zuzzanna_mask 18
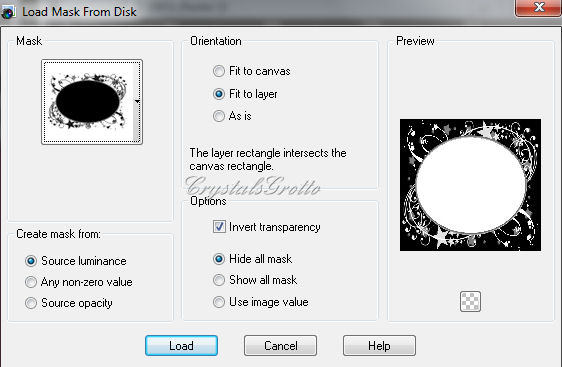
Source Luminance ticked, Fit to layer, Invert transparency ticked, Hide all mask ticked - Load
Layers, Merge, Merge Group
STEP 3
Change foreground to White, Select your preset shape took, set to Ellipse
Layers, Merge, Merge Group
STEP 3
Change foreground to White, Select your preset shape took, set to Ellipse

Anti-alias ticked, Create as vector ticked, Line style solid, Width 2.00
Draw a small ellipse in the center
Pull out the center nodes (circled in red) to make the ellipse fit into the center of the dark circle
Draw a small ellipse in the center
Pull out the center nodes (circled in red) to make the ellipse fit into the center of the dark circle
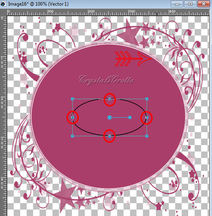
(you can see my white Ellipse, marked by the red arrow)
With magic wand,
With magic wand,

Replace, RGB Value Tolerance 12, Contiguous ticked Feather 0, Anti-alias ticked, Outside
Click inside the white ellipse,
You can delete your white ellipse layer now,
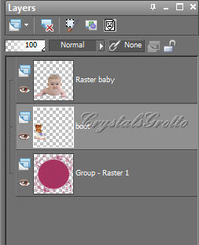
STEP 4
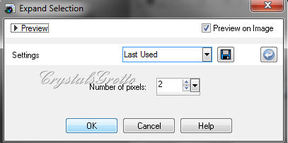
On your layers palette make sure mask layer is highlighted Selections, modify, Expand 2,
Click inside the white ellipse,
You can delete your white ellipse layer now,
STEP 4
On your layers palette make sure mask layer is highlighted Selections, modify, Expand 2,
Effects, texture effects, Texture
Look for the Grain-long that you saved earlier
Look for the Grain-long that you saved earlier
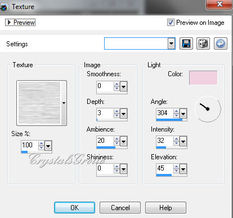
100%, 0, 3, 20, 0, 304, 32, 45 Colour #f0d0df
Selections, select none.
STEP 5
Maximize BabyBlamg Edit copy, you can close this now,
Back to your canvas, Edit paste as new layer
Move baby to bottom of circle
Select the Freehand Selection Tool
Selections, select none.
STEP 5
Maximize BabyBlamg Edit copy, you can close this now,
Back to your canvas, Edit paste as new layer
Move baby to bottom of circle
Select the Freehand Selection Tool

Point to point, Add (shift) Feather 0, Smoothing 0, Anti-alias ticked
Change opacity of BabyBlamg to about 79
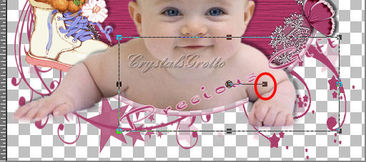
Then select around the baby's chest,
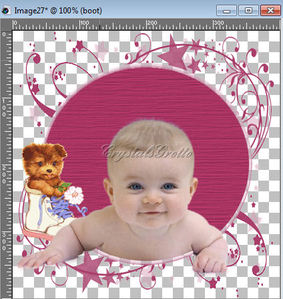
Using the small outer circle as a guide, we want the Baby to look as though it is in the circle.
Make sure you don't get any of the arms or fingers, See my image below
Change opacity of BabyBlamg to about 79
Then select around the baby's chest,
Using the small outer circle as a guide, we want the Baby to look as though it is in the circle.
Make sure you don't get any of the arms or fingers, See my image below
(I have brought my opacity up for this just to show you how much we will be selecting)
Hit delete on your keyboard once
Change the opacity of baby back to 100%
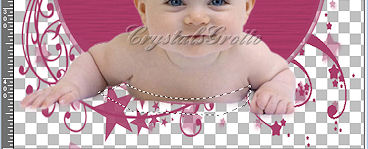
This is what you should have now
Hit delete on your keyboard once
Change the opacity of baby back to 100%
This is what you should have now

Effects, 3D effects, Drop shadow
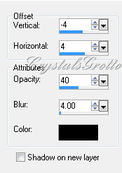
4 (minus) 4, 40, 4.00, Black
STEP 6
Maximize PupInShoe Edit, copy, You can close this now,
Edit paste as new layer Image resize
STEP 6
Maximize PupInShoe Edit, copy, You can close this now,
Edit paste as new layer Image resize
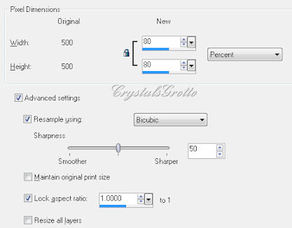
80%, Bicubic Resize all layers unticked.
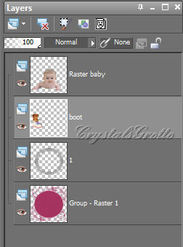
In your layers Palette, drag this layer under your baby,
In your layers Palette, drag this layer under your baby,
And move him to the left of the Circle, See my image below for placement
Effects, 3D effects, Drop shadow same setting as above -4 (minus), 4, 40, 4.00 Black
STEP 7
Maximize cg-lacehalo-9613-2244 Edit copy, You can close this now
Edit paste as new layer,
Drag this under PupInShoe Layer
This is what you should have now
STEP 7
Maximize cg-lacehalo-9613-2244 Edit copy, You can close this now
Edit paste as new layer,
Drag this under PupInShoe Layer
This is what you should have now
Don't worry if your names are different from mine,
STEP 8
Maximize cg-butterflies-10613-1803
You will notice that these are on 3 separate layers Highlight Dark Pink layer
Edit, copy, back to your canvas, Edit paste as new layer,
Highlight Pink layer Edit copy, back to your canvas,
Edit paste as new layer,
Highlight Purple layer
Edit copy, back to your canvas, Edit paste as new layer,
All three of your butterflies will now be in the center of your canvas,
Move Purple butterfly over to top left,
Effects, 3D effects, Drop shadow,
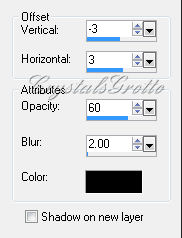
-3 (minus) 3, 60, 2.00 Black
Move Pink butterfly up to top, and just off center
Effects, 3D effects, Drop Shadow, same as above -3 (minus) 3, 60, 2.00 Black
Move Dark Pink Butterfly to the right and on the outside of circle
Effects, 3D effects, Drop shadow, same as above -3 (minus) 3, 60, 2.00 Black
See my image below for placements.
STEP 9
Text tool,
Text tool,

Dragonfly, size 40 Bold highlighted, Center, Anti-alias smooth, Stroke 1.0, Create as Vector,
Type Precious Gift
Grab center node and rotate See image below
Type Precious Gift
Grab center node and rotate See image below
Layers, convert to Raster
Effects 3D Effects, Inner Bevel
Effects 3D Effects, Inner Bevel

#2, 9, 3, 2, 0, 3, 315, 50, 30, Colour white
Effects, 3D effects, drop shadow
Effects, 3D effects, drop shadow
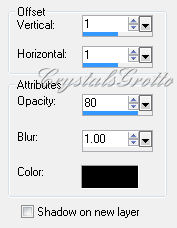
1, 1, 80, 1.00, Black
Add your watermark as a new layer
STEP 10
Layers Merge, Merge Visible
Save as PNG File, Export, PNG Optimizer
On the colours screen
Add your watermark as a new layer
STEP 10
Layers Merge, Merge Visible
Save as PNG File, Export, PNG Optimizer
On the colours screen
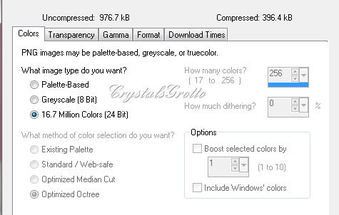
16.7 Million Colours (24 Bit) ticked
Click the Transparency tab
Click the Transparency tab
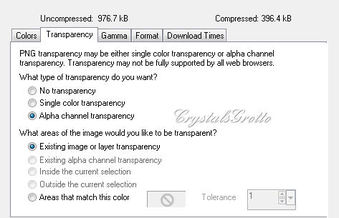
Alpha channel transparency, ticked
Existing image or layer transparency, ticked.
That really is it for this one,
Hope you had as much fun doing this as I had witting it
Existing image or layer transparency, ticked.
That really is it for this one,
Hope you had as much fun doing this as I had witting it
