Oriental
This tutorial is soley my own creation, any similarities to another is purely coincidental
SUPPLIES - HERE
Toto-image
Bm_Under_Beauty
Font - Bonsai Regular
Eye Candy 5 Textures - Textured Noise - HERE
Mask-Dawn_mask 8
Pattern, wood-light
NOTES
I created this tutorial in PSP XII, but any version should work.
Install Eye candy 5 Textures to your plugins folder before opening PSP
Open Font and minimize to desktop, Windows 7 users will need a font viewer
Install your mask into your masks folder
Install Pattern, wood-light into your patterns folder
STEP1
Open a new canvas
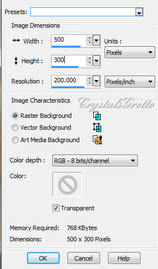
500 x 300 200 Resolution, Raster Background Transparent ticked.
Make foreground colour #af5118 and background #f2e5c7
Change foreground to gradient (foreground/background)
Make foreground colour #af5118 and background #f2e5c7
Change foreground to gradient (foreground/background)
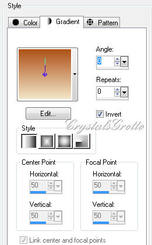
Angle 0, Repeats 0, Invert ticked
Layers New Raster Layer,
Selections select all,
Maximize toto-image, Edit copy, (minimize for use later)
Edit paste into selection.
Selections, select none
In Layers Palette, set Blend mode to Luminance (L) and opacity to 45.
STEP 2
Maximize bm_Under_Beauty_flowers, Make sure your on Raster 1, Edit Copy, Back to canvas,
Edit Paste as new layer, Image Resize,
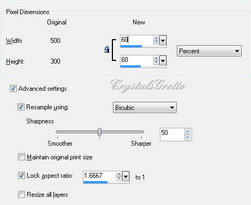
60% Bicubic, Resize all layers unticked.
Move this layer over to the left, (see header image for placement)
Effects, 3d effects, drop shadow
Move this layer over to the left, (see header image for placement)
Effects, 3d effects, drop shadow
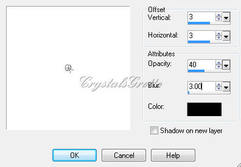
3, 3,3 40 3.00 Black Repeat drop shadow changing Vertical and Horizontal to -3 (minus)
STEP 3
With Selection tool set to Rectangle
Rectangle, Add (Shift) Feather 0, Anti-alias ticked Pull out a rectangle on your canvas
See image below for placement
STEP 3
With Selection tool set to Rectangle
Rectangle, Add (Shift) Feather 0, Anti-alias ticked Pull out a rectangle on your canvas
See image below for placement

Over in your Layer Palette, Highlight Raster 2,
Right click, Promote selection to layer,
Right click on Promoted layer,
Arrange, Bring to top,
Keep Selected
Layers, load/save mask, load mask from disk Find Dawn-mask 8
Right click, Promote selection to layer,
Right click on Promoted layer,
Arrange, Bring to top,
Keep Selected
Layers, load/save mask, load mask from disk Find Dawn-mask 8
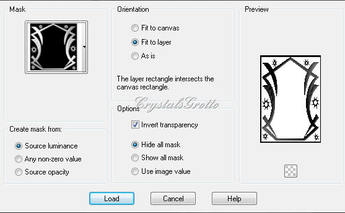
Source Luminance ticked, Fit to layer ticked, Invert transparency ticked, Hide all mask ticked.
Layers, merge, merge group,
Selections, modify, select selection borders
Layers, merge, merge group,
Selections, modify, select selection borders
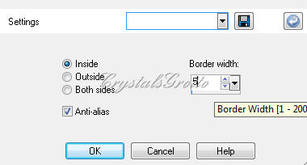
Inside ticked, Anti-alias ticked, Border width 5
Change foreground to pattern, look for wood-light
Change foreground to pattern, look for wood-light
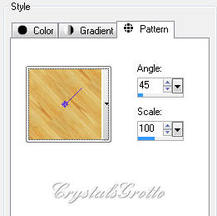
Angle 45, Scale 100
With paint bucket tool, flood fill the selection with the wood pattern,
Effects 3d effects, drop shadow - same settings as above 3, 3, 40, 3.00 - Black
Repeat drop shadow changing Vertical and Horizontal to -3 (minus)
Selection, Select none
Layers, merge, merge all (flatten)
STEP 4
Change your foreground colour #f473e0 Image, Add border
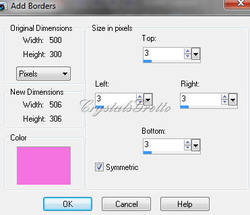
Foreground colour (#f473e0), 3, Symmetric ticked.
Selections, select all, selections modify, Contract 3,
Effects, 3d effects, Cutout, 0, 0, 90, 20.00, Black
Selections Invert,
Effects 3d effects, Inner bevel
Selections, select all, selections modify, Contract 3,
Effects, 3d effects, Cutout, 0, 0, 90, 20.00, Black
Selections Invert,
Effects 3d effects, Inner bevel
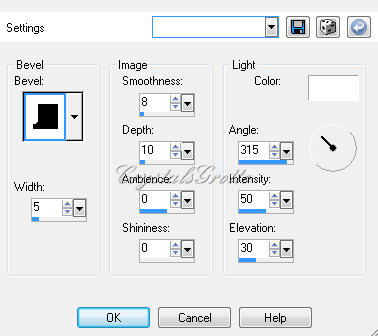
#5, 5, 8, 10, 0, 0, 315, 50, 30 colour White.
Selections select none,
STEP 5
Image, add border 40, colour not in image,
With magic wand select the large border
Add (shift), RGB Value, Tolerance 15, Contiguous ticked, Feather 0, Anti-alias ticked, Outside
Maximize toto-image
Edit, copy, back to canvas,
Edit paste into selection.
Effects Eye Candy 5 Textures, - Texture Noise
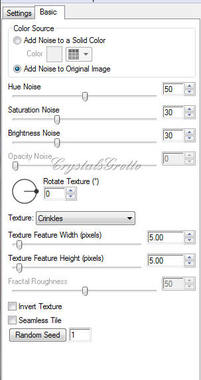
Add noise to original image ticked, 50, 30, 30, 0, Rotate Texture 0, Texture Crinkles, 5.00, 5.00,
Invert Texture and Seamless Tile unticked.
Selections, select none,
STEP 6 Image add border,
Foreground colour (#f473e0), 3, Symmetric ticked. With magic wand - Same settings, (these should already be in your magic wand toolbar) Effects, 3d effects, Inner Bevel, same settings as above, (these should already be in the bevel window) Selections select none,
STEP 7 With text tool with these settings

Bonzai, 30 pixels, Center Directions Vertical and Right, Anti-alias sharp, Vector,
Type your name, or text of your choice
Layers, convert to Raster
Layer, Effects 3d effects, drop shadow
Type your name, or text of your choice
Layers, convert to Raster
Layer, Effects 3d effects, drop shadow
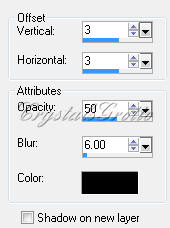
3, 3, 50, 6.00 Black
Add your watermark
Layers merge, merge all (flatten)
Image resize,
Add your watermark
Layers merge, merge all (flatten)
Image resize,

Width 500, height will adjust automatically, Resize all layers ticked,
Optional step
Adjust, Sharpness, sharpen.
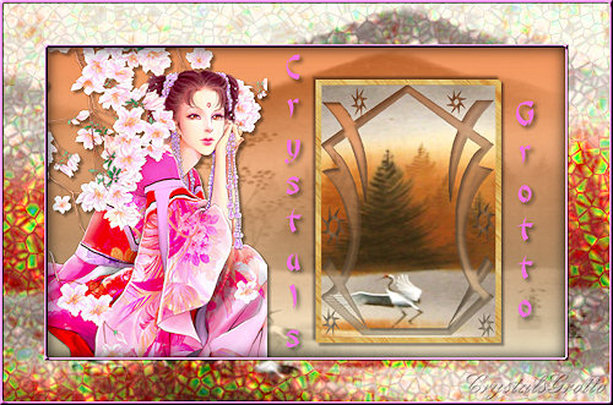
That's it your all done,
Hope you enjoyed this tutorial as much as I enjoyed writing it.
Optional step
Adjust, Sharpness, sharpen.
That's it your all done,
Hope you enjoyed this tutorial as much as I enjoyed writing it.
