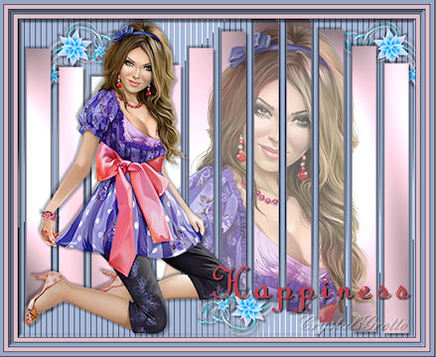
Happiness
This Tutorial is solely my own creation and any similarities to another is purely coincidental
Remember To Save Often
SUPPLIES - HERE
FRScript Font
Cg-happiness mask
SATC-Misticheskaya-MIA
SG-corner
Tramages - Tow the line, and Pool Shadow HERE
NOTES
Save mask to Mask folder
Tramages Plugin to your Plugin Folder BEFORE opening PSP
Open FRScript font and minimise to your desktop, Windows 7 users will need a font viewer
Please feel free to use your own supplies
STEP 1
Change your Foreground colour to #a8b9d9 (or choose your own)
Open a new canvas
500, 400, 200.00, Raster Background, Transparent ticked.
Select your flood fill tool and flood fill your canvas with your foreground colour
Effects, Tramages, Tow the line
80, 54, 48, 9 OK
STEP 2
Layers new Raster Layer, Change Foreground colour to #f5d1de
Select your flood fill tool and flood fill Raster 2 layer with foreground colour
Layers, Load/save mask, Load mask from disk Look for cg-happiness mask
Source Luminance selected, Fit to layer selected, Hide all mask selected, Load.
Now before we merge this group, we are going to select our magic wand
Add (shift), RGB Value, 10, Contiguous ticked, Feather 0, Anti-alias ticked, Outside
Select each of the slats that we have just made Layers, Merge, Merge Group.
Effects, Tramages, Pool Shadow
Change Intensity to 92, Everything else stays as the default DO NOT DESELECT YET.
Maximise SATC-Misticheskaya-MIA Shift D to duplicate the original, Minimize tube we will need it again later,
Making sure you are on Calque 1 layer Layers, Delete
Select your selection tool
Rectangle Add(shift) Feather 0, Anti-alias ticked
Select bottom half of tube,
Once selected hit delete on your keyboard once Selections, Select none
Edit Copy, You can close this now,
Back to your canvas Edit Paste as new Layer,
Once you have the tube where you want Selections Invert Hit Delete on your keyboard once, (if your not happy with your placement, just go to Edit, Undo and then start again)
Lower the opacity of this layer to 63
Highlight Group - Raster 2 layer
Effects, 3D effects, Drop shadow
3, 3, 40, 3.00 Black Repeat Drop Shadow changing Vertical and Horizontal to -3 (minus) Selections Select None,
STEP 3
Highlight Raster 2 Layer Maximise SATC-Misticheskaya-Mia Make sure you are on Violet layer, Edit copy, Back to your canvas Edit Paste as new layer Image, Resize
48%, Smart Size, Resize all layers unchecked OK
Select your move tool and move the tube to the left hand side See my image below for placement.
Effects, 3D effects, Drop shadow
3, 3, 30, 3.00 Black Repeat Drop shadow changing Vertical and Horizontal to -3 (minus)
STEP 4
Maximize SGcorner Edit copy, back to your canvas Edit Past as new layer Image Resize
80%, smart size, Resize all layers Not ticked.
Effects, 3D effects, Drop Shadow
3, 3, 40, 3.00, Black
Repeat the drop shadow, changing Vertical and Horizontal to -3 (minus)
Move to the bottom centre of image
Layers Duplicate, Image, Flip Image Mirror, Move to the left hand
Layers Duplicate, Image Mirror Move over to the right hand side
Over in your layers palette Hide the bottom 4 layers, by clicking on the little eye beside each layer
Layers, Merge, Merge Visible,
Layers, View, View all - All your layers, should now be open
In your layers Palette, move the Merged layer under Group - Raster 2 layer
Select your Eraser tool
Square, 34, Hardness 100, Step 32, Opacity 100
Just remove any of the corners that are showing under your slats
STEP 5
Change Background colour to a dark colour, or use mine #c5424d
Foreground Null Select your text tool
French Script MT, size 60, Bold, Center, Anti-alias Sharp, Create as Vector, Line Style solid,
Type Happiness, or text of your choice Layers, Convert to Raster Layer
Effects 3D Effects, Drop Shadow 2, 2, 70, 2.00 Black
Add your Watermark as a new layer. Layers, Merge, Merge All (flatten)
STEP 6
Change Foreground colour to #f5d1de Background colour to #a8b9d9
A Image Add Border
1, Symmetric ticked, Colour Black
B Image Add Border
5, Symmetric ticked, colour #f5d1de
C Image Add Border 1, Symmetric ticked, Colour Black
D Image Add Border
5, Symmetric ticked, colour #a8b9d9
E Image Add Border 1, Symmetric ticked, colour Black
F Selections, Select All, Selections, Modify, Contract,
13 Selections, Invert
G Effects, 3D Effects, Outer Bevel
#2, 6, 0, 20, 0, 0, 315, 30, 50 Selections Select none,
We are now going to repeat steps B to G once more
Image Add Border 5, Symmetric ticked colour #f6d1de
Image Add Border 1, Symmetric ticked, colour Black
Image Add Border 5, Symmetric ticked, colour #a8b9d9
Image Add Border 1, Symmetric ticked, colour Black
Selections, Select All, Selections, modify, contract - 13
Selections Invert
Effects 3D Effects Outer Bevel Settings should still be in your outer bevel #2, 6, 0, 20, 0, 0, 315, 30, 50 Selections,
Select None,
Save as a JPEG
And that's it we are done, Hope you enjoyed this tutorial as much as I enjoyed writing it.
