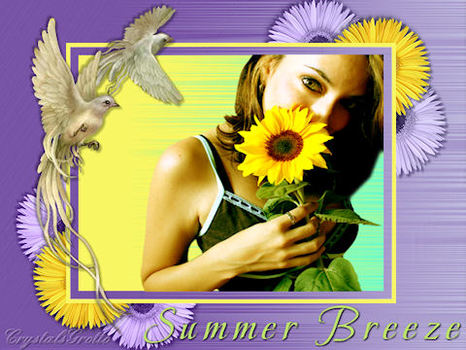
Summer Breeze
This tutorial is solely my own creation, and any similarities to another is purely coincidental
SUPPLIES - HERE
Bh-blueskyline
Cg-summerbreeze-mask
DC_Doves
Flower 05
Tubebyhs-166-Beauties-
C SnagglePuss Font
VM Stylize Plugin
NOTES
Save bh-blueskyline to your textures folder
Save cg-summerbreeze-mask to your mask folder
Save these before opening your PSP
Open SnagglePuss Font and minimize to your desktop (Windows 7 users will need a font viewer)
Open DC_Doves, Flower 05 and Tubesbyhs-166-Beauties-C and minimize for now
I wrote this Tutorial using PSP X2 but any version should work, with some minor adjustments Please feel free to use your own supplies and colours
STEP 1
Open a new Canvas Width 600, Height 450, Resolution 300.00, Raster Background, Transparent ticked.
Set your Foreground colour to #9871c2 Flood fill your canvas
Effects, Texture Effects, Texture, Look for bh-blueskyline that you saved earlier 100, 0, 2, 20, 0, Colour #bdb3cc, 304, 32, 45,
Effects, VM Stylize, Motion Trail Wild (mine may look different from yours as mine are saved to Filters Unlimited) 105, 126, 36, 28, 50, 221, 230, 247
STEP 2
Change Foreground colour to #f8f663
Layers, New Raster Layer
Flood fill layer with Foreground colour #f8f663
Layers, Load/save mask, Load mask from disk Look for cg-summerbreeze-mask Source Luminance ticked, Fit to layer ticked, Invert transparency Not Ticked, Hide all mask ticked. Load
Layers, Merge, Merge Group
Selection tool Rectangle, Add (shift) Feather 0, Anti-alias ticked, click Custom selection,
You will now get a box pop open Type in Top 70, Left 100, Right 495, Bottom 375.
You will now see marching ants all around the center of your mask
Effects, VM Stylize, Motion trail wild, 90, 127, 36, 28, 50, 44, 255, 255,
Selections, select none,
STEP 3
Maximize Tubebyhs-166-Beauties-C Edit, copy, You can close this now
Back to your canvas, Edit paste as new layer
Move this over to the right and into the corner of your mask layer
STEP 4
Maximize Flower 05 Edit copy, You can close this now
Back to your canvas, Edit Paste as new layer,
Image Resize 80%, Smart Size, Resize all layers Not ticked.
Repeat this resize once more
Effects 3D effects, Drop Shadow 3, 3, 40, 3.00 Colour Black,
Repeat Drop shadow, changing Vertical and Horizontal to -3 (minus)
Move to the bottom left corner of your mask
Edit Copy, Edit paste as new layer,
Drag Raster 4 layer, below Raster 3,
Move to bottom left of mask, and just above your first flower
Edit paste as new layer Move to bottom left of mask, and to the right of your first flower
Drag each of the flower layers below your Group - Raster 2 (mask layer)
Once your happy with your flower placement Highlight Raster 5,
Layers Merge, Merge Down,
Change blend mode to Luminance (Legacy)
Eraser tool Square, size 94, Hardness 100, Step 32, Density 100, Thickness 100, Rotation 0, Opacity 100,
Just erase the flowers showing up between the mask, (see header image)
Highlight Raster 3,
Eraser tool, Same settings as above, erase the last flower
Highlight Raster 4,
Layers Duplicate, Image, Mirror, Image Flip, With move tool, move flowers so they are sitting on the small yellow outer frame
Highlight Raster 3 Layers, Duplicate, Image Mirror, Image Flip, Move this so that flower is sitting nicely on outer yellow frame of Mask.
STEP 5
Maximize DC-Doves,
Make sure Raster 1 layer is highlighted, Edit copy,
You can close this now Highlight Raster 2 in your Layers Palette,
Back to canvas, Edit Paste as new layer Move to the left hand side of your canvas
Effects, 3D effects, drop shadow 3, 3, 30, 3.00 Black, Shadow on new layer Not ticked
Repeat drop Shadow Changing Vertical and Horizontal to -3 (minus)
STEP 6
Change Background to #bce16d, Foreground Null
Text tool, SnagglePuss, 60, Bold highlighted, Center, Anti-alias Sharp, Create as Vector
Type - Summer Breeze (or text of your choice)
Move down to Bottom Right Hand side
Layers, Convert to Raster Layer,
Effects, 3D Effects, Drop Shadow 1, 1, 100, 3.00 Black, Shadow on new layer Not ticked.
Add your Watermark on a new layer
Layers, Merge, Merge all (flatten) Save as a JPEG
