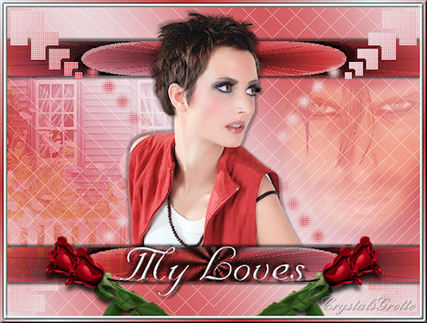
My Love
This Tutorial is solely my own creation, any similarities to another is purely coincidental
This Tutorial was written in PSP 12, but any version should do with some minor adjustments.
Remember to Save Often
Supplies - Here
Cg-mylovesmask Red Rose HousePic GreyeHunkamg Kitty.SPhoto-100509 Affair 1 Font
Plugins Needed
AP Lines - Silverlining Alf's Power Sines - Multi Petal AB-22
Notes
Save all your plugins to your plugins folder, before opening PSP Save your mask to your masks folder Open tubes in PSP, and minimize for now Tubes were shared through a sharing group, Mask I made, Open font and minimize to desktop, Windows 7 users and above will need a font viewer
Feel free to choose your own colours tubes and images
Step 1
Make Foreground dark colour #cc3b40 and Background light colour #eff4f8
Change Foreground to Gradient,
Angle 45, Repeats 3, Linear And look for Foreground/background
Open a new Canvas - File New 600, 450, 200.00 Resolution, Raster Background, Transparent Ticked.
Flood fill canvas with Gradient, Adjust, Blur, Gaussian Blur 50
Layers, New Raster Layer, Change Angle of Gradient to 315, All other setting remain the same as above
Flood fill Layer Adjust Blur Gaussian Blur 50
Layers Load/Save Mask from Disk
Source Luminance checked, Fit to Canvas checked, Invert Transparency not ticked, Hide all mask checked. Load
Over in your layers Palette, right click on the mask layer and click Delete
You will get a pop up window click Yes
Layers Merge, Merge Group Effects AP Lines - Silverlining
Dotty Grid, Gap 3, Cutoff -1 (minus), Line 10, Colour(R) all three 255, create lines not gaps ticked. OK
Step 2
Highlight Raster 1 layer, Effects, AP Lines - Silverlining
Mixing, Gap 34, Cutoff -1 (minus), Line 10, Colour (R) all three 255, create lines not gaps, Blend mode change to overlay OK
Step 3
Highlight Group - Raster 2 Layer New Raster Layer Selections Tool, Custom Selection,
When the little pop up box opens type in
Top 50, Left 0, Right 600, Bottom 100, OK
Flood fill Selection with your background colour #eff4f8, Effects, Alf's Power Sines, Multi Petals
Amplitude 191, Frequency 172, Red 0, Green, 15, Blue 62, Width 120, Mode 64, Apply
In your layers Palette change the blend mode for this layer to Luminance,
Effects Plugins AB 22, Cutting Edge
D 11, m 2, d 17, m 24, Red 23, Green 110, Blue 57, Mix 21, Apply
Selections select none. Effects, 3D effects, Drop Shadow
4, 0, 30, 4.00, Black Repeat Drop shadow changing Vertical to -4 (minus) OK
Layer Duplicate, Image, flip Move these two layers under Group Raster 2
Step 4
Highlight Raster 1 Layer Maximise House Pic, Edit, copy, Back to your canvas, Edit Paste as new layer Image Resize
50%, Smart size, Resize all layers Not ticked.
Eraser Tool, with these settings
Round, Size 71, Hardness 21, Step 32, Density 100, Thickness 100, Rotation 0, Opacity 100
Close off Raster 2 and copy of Raster 2
Run this around the house image taking off the hard outside edges, This is how mine looks now
Move over to the left, (see header image for placement) Set Blend mode to Soft Light
Maximize GreyeHunkamg, Edit, Copy, Edit Paste as new layer Image Resize, same settings as above, 50%, smart size, Resize all layers Not ticked.
With your eraser tool again, same settings as above Round, Size 71, Hardness 21, Step 32, Density 100, Thickness 100, Rotation 0, Opacity 100 Go around the edges of GreyeHunkamg, to take off the edges, Here is how mine looks
Move over to the right hand side, (see header for placement) Change blend mode to Screen and Opacity to 67.
Step 5
Highlight Group Raster 2 layer Maximize Kitty.S-Photo-100509 Edit Copy, Edit Paste as new Layer Image Resize, same settings as above, 50%, Smart size, Resize all layers Not ticked.
Open Raster 2 and copy of Raster 2 Layers Selection Tool,
Rectangle, Add (shift), Feather 0, Anti-alias ticked.
Use the bottom ribbon as a guide and draw a rectangle over the bottom half of the tube, Make sure you are on your tube layer hit delete on your keyboard once
Now we are going to do some layer arranging Make sure you are on Raster 5, and right click, When the window opens click Arrange, Move to top
Highlight Copy of Raster 2, Right click in your layers palette, Arrange, Move to top.
Highlight Raster 5, Effects, 3D Effects, Drop Shadow,
4, 4, 30, 4.00, Black
Repeat Drop Shadow, Changing Vertical and Horizontal to -4 (minus)
Step 6
Highlight Copy of Raster 2 Layer
Foreground Null, Background colour #eff4f8 Text tool
Affair 1, size 80, Bold Highlighted, Center, Anti-alias Sharp, Create as Vector, Solid line style Type My Loves, (or text of your choice)
Place in Center of bottom ribbon, Layers, Convert to Raster
Effects, 3D Effects, Inner Bevel
#2, 7, 3, 6, 2, 4, White, 315, 30, 50 Effects, 3D Effects, Drop Shadow, Settings as above 4, 4, 30, 4.00, Black
Repeat Drop Shadow, changing V and H to -4 (minus)
Step 7
Maximize Red_rose Edit copy Edit Paste as new layer
Image resize, same settings as above 50%, Smart size, Resize all layers Not ticked.
Image Free Rotate,
Left, 25.00, All layers Not ticked, Rotate single layer around canvas center Not ticked, Move down to bottom, (see header image for placement)
Layer Duplicate, Move this down
Layers Merge, Merge Down
Layers Duplicate, Image Mirror
Step 8
Add watermark as a new layer,
Layers, Merge, Merge All (Flatten)
Image Add borders, 5, symmetric ticked, background colour, #eff4f8
Select border with magic wand Add(Shift), RGB Value, Tolerance 5, Contiguous ticked, Feather 0, Anti-alias ticked, Outside.
Effects, 3D Effects, Inner Bevel Same settings as above, #2, 7, 3, 6, 2, 4, White, 315, 30, 50 Selections, Select None,
Image Add borders, same settings as above, 5 symmetric ticked, foreground colour any that's not in image,
Select Border with magic wand, same settings as above, Add(Shift), RGB Value, Tolerance 5, Contiguous ticked, Feather 0, Anti-alias ticked, Outside. Flood fill with Gradient
Effects, 3D Effects, Inner Bevel Same settings as above, #2, 7, 3, 6, 2, 4, White, 315, 30, 50 Selections, Select None,
Save as Jpeg
Hope you enjoyed this tutorial as much as I enjoyed writing it.
