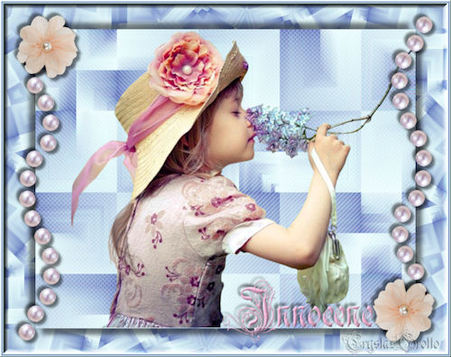
Innocence
This Tutorial is solely my own creation, any similarities to another is purely coincidental.
Tutorial was written in PSP 12 but should work in any version
Tutorial was written in PSP 12 but should work in any version
The Tube used in this Tut came from Linda click on the banner below to take you straight to Linda's site

Thank you Linda for allowing me to use your beautiful Tubes
Supplies:-
LF-GirlFlower-16012014
cg-pearlflower-272014-1957
cg-stringpearls-272014-1959
Rothenbg Font
Plugins:-
AFS Import - Emission
Amphisoft - Out of Noise
Mehndi - Sorting Tiles
AP Lines (Silverlining)
Notes:-
Open all tubes and minimize for now
Install your plugins to your plugin folder Before opening PSP
Open and minimise font, Window 7 users will need font viewer
Save Often
Make Foreground #d4f4f7 (or colour of your choice) and background #8391bd (or colour of your choice)
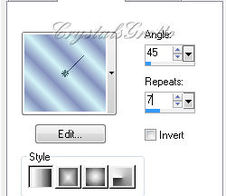
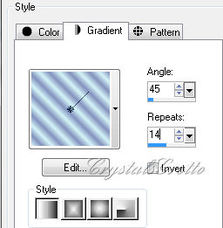
Linear, 45, 7 Invert Unchecked
Step 1
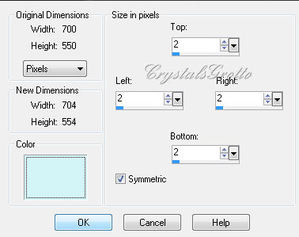
Open New Canvas
Step 1
Open New Canvas
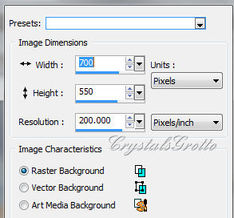
700, 550, Raster Background
Flood fill with Gradient
Step 2
Effects, Plugins, Afs Import - Emmisions
Flood fill with Gradient
Step 2
Effects, Plugins, Afs Import - Emmisions
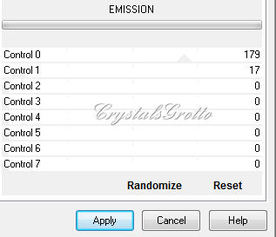
179, 17, 0, 0, 0, 0, 0, 0, - Apply
Effects Plugins Amphisoft - Out of Noise
Effects Plugins Amphisoft - Out of Noise
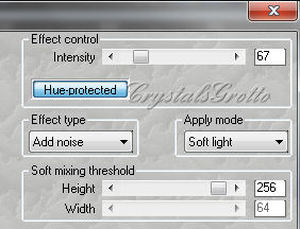
67, Add noise, soft light, 256, 64 - Apply
Effects Plugins, Mehdi - Sorting tiles
Effects Plugins, Mehdi - Sorting tiles
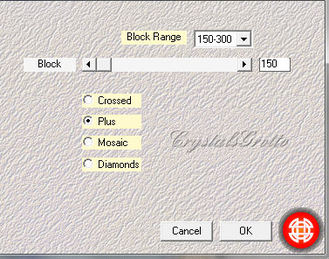
150-300, 150, Plus - Ok
Effects, Plugins AP Lines (Silverlining)
Effects, Plugins AP Lines (Silverlining)
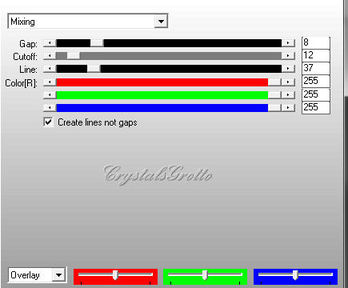
Mixing, 8, 12, 37, 255, 255, 255, Create lines not gaps ticked, Overlay - OK
Step 3
Maximise LF-GirlFlower-16012014 Make sure you are on Tube layer Edit copy,
Back to your canvas,
Edit Paste as new layer
Image Resize
Step 3
Maximise LF-GirlFlower-16012014 Make sure you are on Tube layer Edit copy,
Back to your canvas,
Edit Paste as new layer
Image Resize
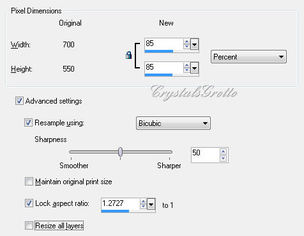
85% Resize all layers Unticked
Move the Tube over to the right slightly, until the Branch reaches the Right edge
Layers, Merge, Merge Visible
Image Resize,
Move the Tube over to the right slightly, until the Branch reaches the Right edge
Layers, Merge, Merge Visible
Image Resize,
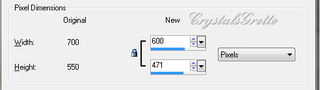
Width 600, height will adjust automatically Resize all layers Unticked
Step 4
Layers, Add new layer,
Layers, Arrange Send to bottom
Change foreground gradient Repeats to 14
Step 4
Layers, Add new layer,
Layers, Arrange Send to bottom
Change foreground gradient Repeats to 14
Everything else stays the same
Flood fill Raster 1 with Gradient
Now we are going to Repeat Step 2 but leaving out the last step AP lines.
All settings remain the same
Effects, Plugins, Afs Import - Emmisions 179, 17, 0, 0, 0, 0, 0, 0, - Apply
Effects Plugins Amphisoft - Out of Noise 67,
Add noise, soft light, 256, 64 - Apply
Effects Plugins, Mehdi - Sorting tiles 150-300, 150, Plus - Ok
Effects, Reflection Effects, Kaleidoscope
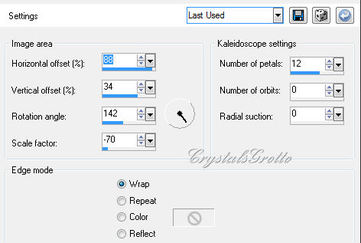
88, 34, 142, -70, 12, 0, 0, Wrap
Step 5
Make sure you are on Merged layer
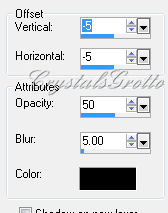
Effects 3d Effects, Drop Shadow
Step 5
Make sure you are on Merged layer
Effects 3d Effects, Drop Shadow
10, 10, 50, 10.00 Black
Repeat drop shadow, changing Vertical and Horizontal to -10 (minus)
Step 6
Maximise cg-pearlflower-272014-1957
Edit copy, Back to canvas,
Edit Paste as new layer
Move flower up to the top left hand corner,
Selections, select all, Selections float, Selections defloat
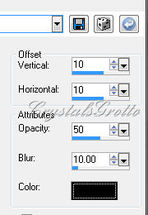
Effects 3d effects, Drop Shadow,
Repeat drop shadow, changing Vertical and Horizontal to -10 (minus)
Step 6
Maximise cg-pearlflower-272014-1957
Edit copy, Back to canvas,
Edit Paste as new layer
Move flower up to the top left hand corner,
Selections, select all, Selections float, Selections defloat
Effects 3d effects, Drop Shadow,
5, 5, 50, 5.00 Black
Selections, select none
Maximise cg-stringpearls-272014-1959
Edit, copy, back to canvas,
Edit paste as new layer,
Move so they are sitting along the left hand side (see header image for placement)
Drag these string of pearls under your flower layer
Make sure you are back on Raster 2 layer - the flower layer
Layers, Merge, Merge down
Layers Duplicate, Image Mirror, Image Flip
Step 7
Text tool,
Change Background colour to #dba5c0, Foreground Null

Rothenburg Decorative, 60, Anti-alias sharp, Create as Vector
Type Innocence
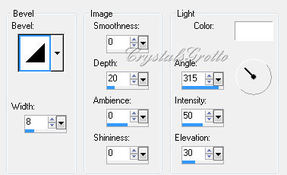
Effects, 3d effects, Inner Bevel
Type Innocence
Effects, 3d effects, Inner Bevel
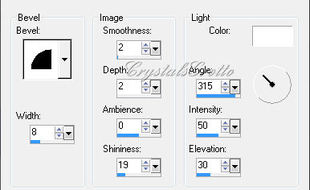
#2, 8, 2, 2, 0, 19, 315, 50, 30, White
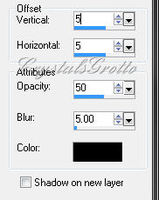
Effects, 3d effects, Drop Shadow
Effects, 3d effects, Drop Shadow
-5, -5, 50, 5.00 Black
Step 8
Layers, Merge Merge All (flatten)
Image Add borders
Step 8
Layers, Merge Merge All (flatten)
Image Add borders
Foreground colour #d4f4f7, 2, symmetric ticked
Image Add border, background colour #8391bd 2, symmetric ticked
Image Add border Foreground colour #d4f4f7, 2 symmetric ticked
Selections Select all, Selections Modify, Contract, 6 Selections Invert
Effects, 3d Effects, Outer Bevel
Image Add border, background colour #8391bd 2, symmetric ticked
Image Add border Foreground colour #d4f4f7, 2 symmetric ticked
Selections Select all, Selections Modify, Contract, 6 Selections Invert
Effects, 3d Effects, Outer Bevel
#1, 8, 0, 20, 0, 0, 315, 50, 30, White
Selections Select None
Add your watermark to a new layer
Image, Resize 600 pixels, height will adjust itself, All layers Ticked.
Save as JPEG
Selections Select None
Add your watermark to a new layer
Image, Resize 600 pixels, height will adjust itself, All layers Ticked.
Save as JPEG
