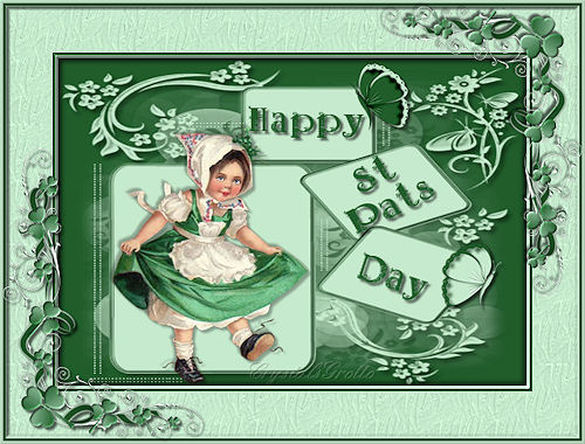
Happy St Pats Day
Well here is my very first Tutorial, A big Thanks to Ruth, who convinced me to try my hand at doing this, and Many Thanks to all the ladys who tested it for me.
This Tutorial is soley my own creation, any similarities to anything else is purely coincidental.
This Tutorial is soley my own creation, any similarities to anything else is purely coincidental.
SUPPLIES HERE
Tube - JA-Irish Child
Mask SG-multifloral grungeframe2
Butterfly tubes
Texture - Reeds
Font Vanessa
NOTES
Put mask into mask folder,
Texture into texture folder
Open font and minimise to task bar, Windows 7 users will need a font viewer HERE
JA Irish Child and mask were shared in a sharing group
Butterflies were made by me using a script from Tees Scraps (can't find a link for her blog)
Corner was made by me.
Open tubes and minimise for now
STEP 1
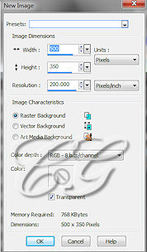
Open new canvan 500 x 350 200 Res, Raster Background, Transparent
Tube - JA-Irish Child
Mask SG-multifloral grungeframe2
Butterfly tubes
Texture - Reeds
Font Vanessa
NOTES
Put mask into mask folder,
Texture into texture folder
Open font and minimise to task bar, Windows 7 users will need a font viewer HERE
JA Irish Child and mask were shared in a sharing group
Butterflies were made by me using a script from Tees Scraps (can't find a link for her blog)
Corner was made by me.
Open tubes and minimise for now
STEP 1
Open new canvan 500 x 350 200 Res, Raster Background, Transparent
Choose a dark foreground color, (mine #205d2b) and a light background color (mine #c6eacd)
Fill canvas with dark color
Layer, new raster layer, fill with light color
Layers, load/save mask, load from disk, look for SG-multi-floralgrunge frame2
Fill canvas with dark color
Layer, new raster layer, fill with light color
Layers, load/save mask, load from disk, look for SG-multi-floralgrunge frame2

Source Luminance ticked, fit to canvas ticked, hide all mask ticked,
Over in your layers palette, right click, merge group
Effects 3D effects Drop Shadow
Over in your layers palette, right click, merge group
Effects 3D effects Drop Shadow
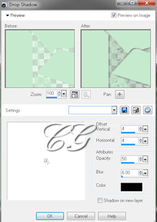
4, 4, 50, 6 Black shadow on new layer unticked.
Layers, Merge, MergeVisible Layers
STEP 2
Maximise JA-IrishChild, copy and close original we don't need this anymore,
Back to your canvas paste as new layer,
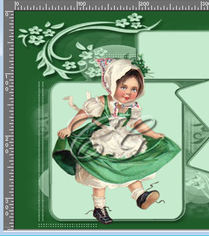
Image Resize 70% all layers unticked
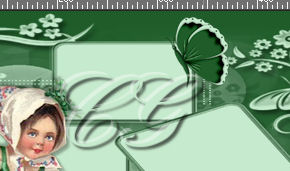
Move child over to left hand side (see screenshot)
Layers, Merge, MergeVisible Layers
STEP 2
Maximise JA-IrishChild, copy and close original we don't need this anymore,
Back to your canvas paste as new layer,
Image Resize 70% all layers unticked
Move child over to left hand side (see screenshot)
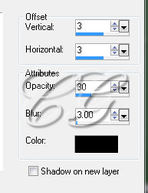
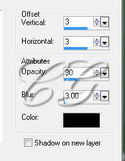
Effects 3d effects drop shadow

3, 3, 30 3.00
Repeat drop shadow changing Vertical and Horizontal to -3 (minus)
STEP 3
Maximise Butterfly1-9313-cg-1140, copy, you can close this now we won't need it anymore
Back to canvas, paste as new layer,
Image, mirror and move to top right
Repeat drop shadow changing Vertical and Horizontal to -3 (minus)
STEP 3
Maximise Butterfly1-9313-cg-1140, copy, you can close this now we won't need it anymore
Back to canvas, paste as new layer,
Image, mirror and move to top right
Effects 3D effects drop shadow

3, 3. 60, 3.00 Black, shadow on new layer unticked
Maximise Butterfly2 9313-cg-1145, copy and close original we won't need it anymore,
Back to canvas, paste as new layer, move over to bottom right
Maximise Butterfly2 9313-cg-1145, copy and close original we won't need it anymore,
Back to canvas, paste as new layer, move over to bottom right
Add same drop shadow as first butterfly
3, 3, 60, 3.00 Black, shadow on new layer unticked.
STEP 4
Make background your dark color,
Select your text tool with these settings
3, 3, 60, 3.00 Black, shadow on new layer unticked.
STEP 4
Make background your dark color,
Select your text tool with these settings

Vanessa size36, Bold ticked, center ticked, smooth stroke 0 Vector
Type "Happy" enter,
with the nodes squeeze and pull slightly, until you are happy,
centre text into top box,
Convert to Raster layer
Move down to center box and type "St" - enter, then "Pats" this will keep these two words together, squeeze and rotate until your happy with the image
Convert to Raster layer
Now in the bottom box type "Day", - enter,
squeeze and rotate until your happy with your image
Convert to Raster layer This is what your image should look like now.

Close off all layers by clicking on the little eye in your layer palette, apart from the 3 text layers
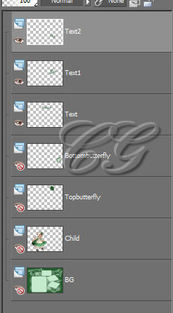
Layers, Merge, Merge Visible,
your text layers will now all be on one layer
Effects - 3D effects - drop shadow, 3, 3, 60, 3 Black
your text layers will now all be on one layer
Effects - 3D effects - drop shadow, 3, 3, 60, 3 Black
Open up all layers, by clicking on the little eyes again.
Add your watermark
Layers Merge All flatten.
STEP 5
Image, Add border, your light colour, 3 symmetric ticked
Add your watermark
Layers Merge All flatten.
STEP 5
Image, Add border, your light colour, 3 symmetric ticked

Image Add border, 3 your dark color,
Selections, select all, selections modify, contract, 6
Effects, 3D effects, cutout
Selections, select all, selections modify, contract, 6
Effects, 3D effects, cutout
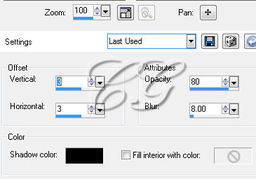
3, 3, 80, 8.00 Black
Repeat cut out changing Vertical and Horizontal to -3 (minus)
Selections, Invert
Effects 3D effects Inner Bevel
Repeat cut out changing Vertical and Horizontal to -3 (minus)
Selections, Invert
Effects 3D effects Inner Bevel
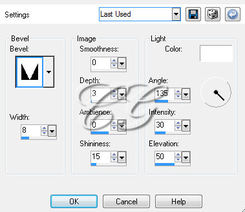
Bevel #8, 8, 0, 3, 0, 15, 135, 30, 50 White
Select none
Step 6
Image add border, 50 your light color, symmetric ticked
Select with magic wand
Effects, texture effects, texture, find your reed texture, or one of your choice
Select none
Step 6
Image add border, 50 your light color, symmetric ticked
Select with magic wand
Effects, texture effects, texture, find your reed texture, or one of your choice
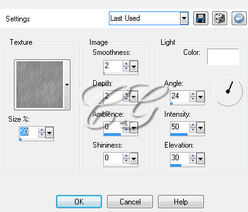
50%, 2, 2, 0, 0, 24, 50, 30 Color white.
Selections Select none,
Step 7
Image, add borders 3 Dark color, symmetric
Image add borders, 3 Light color, symmetric
Selections select all, selections, modify, contract 6
Selections Invert
Effects 3D effects, Outer Bevel
Selections Select none,
Step 7
Image, add borders 3 Dark color, symmetric
Image add borders, 3 Light color, symmetric
Selections select all, selections, modify, contract 6
Selections Invert
Effects 3D effects, Outer Bevel
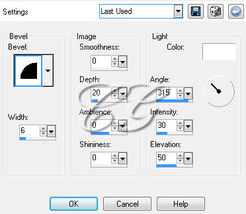
Bevel #2, 6, 0, 20, 0, 0, 315, 30, 50,
Selections select none,
Step 8
Maximise shamrockcorner-9313-cg-1148 Copy, close the original we don't need it anymore,
back to canvas, paste as new layer,
Move to bottom left hand corner
Effects 3D effects, drop shadow,
Selections select none,
Step 8
Maximise shamrockcorner-9313-cg-1148 Copy, close the original we don't need it anymore,
back to canvas, paste as new layer,
Move to bottom left hand corner
Effects 3D effects, drop shadow,
3, 3, 60, 3.00 Black
Layers Duplicate,
Image mirror,
Image Flip
Layers Merge Merge All flatten
Image Resize,
Layers Duplicate,
Image mirror,
Image Flip
Layers Merge Merge All flatten
Image Resize,
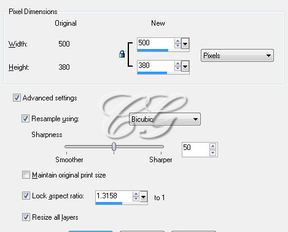
500 pixels, Height will adjust automatically Bicubic, Resize all layers ticked
Adjust, sharpness, sharpen.
Step 9
Save as a JPEG image,
File, Export, JPEG Optimiser
Adjust, sharpness, sharpen.
Step 9
Save as a JPEG image,
File, Export, JPEG Optimiser
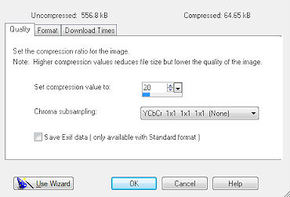
Set compression value to 20
Click ok and save to a location of your choice.
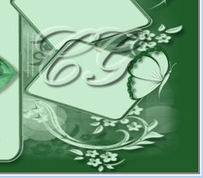
That's it your done, Hope You had as much fun doing this as I had making it.
Click ok and save to a location of your choice.
That's it your done, Hope You had as much fun doing this as I had making it.
