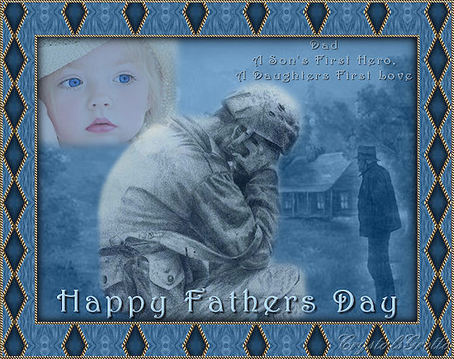
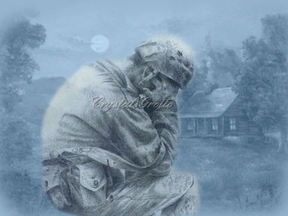
Fathers Day
This Tutorial is solely my own creation, any Similarities to another is purely coincidental
For Dads Everywhere, but especially to the ones that cannot be at home this Fathers Day
SUPPLIES - HERE
Harrington Font
CabinSunset
LilBlueEyes
DC-tatteredDreams
Cg-oldman-11613-1333
Eye Candy5 Textures - Swirl - HERE
Gold Beads pattern
NOTES
Open all tubes in PSP and minimize,
Save Gold Beads to your pattern folder
Save Eye Candy 5 Textures to your plugins folder
Open font and minimize to desktop, (Windows 7 users will need a font viewer)
Save pattern and plugin Before opening PSP
Remember to Save Often
STEP 1
Open a new canvas,
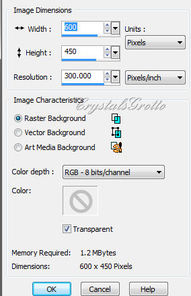
600, 450 300 Resolution, Raster Background, Transparent ticked
Choose a medium to dark blue for foreground colour
I used #46739a
Flood fill canvas,
STEP 2
Layers, New Raster layer,
Selections, Select All
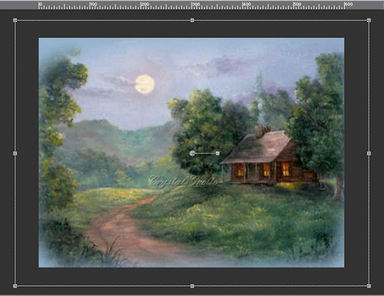
Maximize CabinSunset - You can close this now
Make sure your mist layer is highlighted
Edit, Copy, back to your canvas
Edit Paste into selection
Selections Select None
With your pick tool (Raster Deform tool in PSP 9)
Stretch out the cabin mist slightly
This is how mine looks
Choose a medium to dark blue for foreground colour
I used #46739a
Flood fill canvas,
STEP 2
Layers, New Raster layer,
Selections, Select All
Maximize CabinSunset - You can close this now
Make sure your mist layer is highlighted
Edit, Copy, back to your canvas
Edit Paste into selection
Selections Select None
With your pick tool (Raster Deform tool in PSP 9)
Stretch out the cabin mist slightly
This is how mine looks
In your layer palette change blend mode to Luminance (Legacy) and opacity to 51

STEP 3
Maximize DC-TatteredDreams
Edit copy, you can close this now, Back to your Canvas,
Edit paste as new layer
Image resize
70%, Bicubic, Resize all layers unticked
Maximize DC-TatteredDreams
Edit copy, you can close this now, Back to your Canvas,
Edit paste as new layer
Image resize
70%, Bicubic, Resize all layers unticked
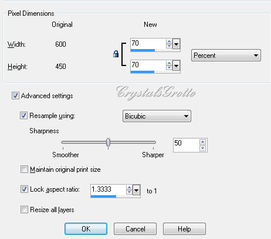
Image Mirror
With your move tool move down to bottom and slightly to the left
This is what you should now have
With your move tool move down to bottom and slightly to the left
This is what you should now have
In your layers palette change opacity to 57
STEP 4
Maximize cg-oldman-12613-1235
Edit, Copy, you can close this now, Back to your canvas,
Edit Paste as new layer.
Image Mirror
In your layers palette, change the blend mode to Luminance (Legacy) and opacity to 57
Move old man over to the right hand side
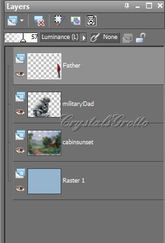
Your layers Palette should now look like this, don't worry about the names being different
STEP 4
Maximize cg-oldman-12613-1235
Edit, Copy, you can close this now, Back to your canvas,
Edit Paste as new layer.
Image Mirror
In your layers palette, change the blend mode to Luminance (Legacy) and opacity to 57
Move old man over to the right hand side
Your layers Palette should now look like this, don't worry about the names being different
STEP 5
Maximize LilBlueEyes
Edit, copy, you can close this now, Back to your canvas,
Edit paste as new layer
Image Resize
Maximize LilBlueEyes
Edit, copy, you can close this now, Back to your canvas,
Edit paste as new layer
Image Resize
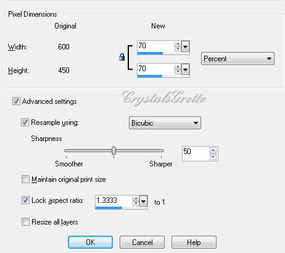
70%, Bicubic, Resize all layers Not ticked
In your layer Palette, move this layer under the soldier,
Change Opacity to 44, Keep blend mode as normal
Move top top Left
Highlight cabin layer (Raster 2)
With your eraser tool
Round, size 40, Hardness 35, Density, Thickness and Opacity 100 Rotation 0
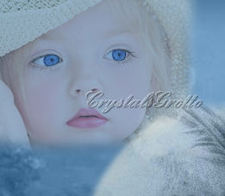
Start to erase the background from the girls face and hat,
This is how mine now looks
In your layer Palette, move this layer under the soldier,
Change Opacity to 44, Keep blend mode as normal
Move top top Left
Highlight cabin layer (Raster 2)
With your eraser tool
Round, size 40, Hardness 35, Density, Thickness and Opacity 100 Rotation 0
Start to erase the background from the girls face and hat,
This is how mine now looks
STEP 6
Layers, Merge, Merge All (Flatten)
Change background colour to #95b4cd and Foreground to Null
Text tool
Layers, Merge, Merge All (Flatten)
Change background colour to #95b4cd and Foreground to Null
Text tool

Font Harrington, size 20, Bold, Center, Anti-alias smooth, Vector Line Style Solid
Type, Dad, A Sons First Hero A Daughters First Love (or you can use your own text)
Move this over the the top right hand side
Layers Convert to Raster Effects,
3D effects, Drop Shadow
Type, Dad, A Sons First Hero A Daughters First Love (or you can use your own text)
Move this over the the top right hand side
Layers Convert to Raster Effects,
3D effects, Drop Shadow
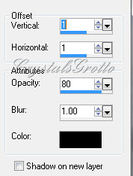
1, 1, 80, 1.00 Black Shadow on new layer not ticked.
Back to your text tool all setting the same except change the size
Back to your text tool all setting the same except change the size

Size 50
Type (or use your own) Happy Fathers Day
Move this down to the bottom,
Objects, Align Horizontal Center in Canvas.
Layers, Convert to Raster Layer
Effects, 3D Effects, Inner Bevel
Type (or use your own) Happy Fathers Day
Move this down to the bottom,
Objects, Align Horizontal Center in Canvas.
Layers, Convert to Raster Layer
Effects, 3D Effects, Inner Bevel
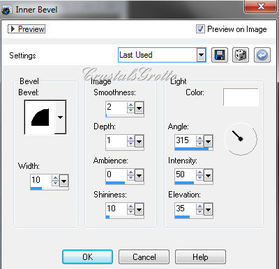
#2, 10, 2, 1, 0, 10, 315, 50, 30 Colour White
Effects, 3D effects, Drop shadow
Effects, 3D effects, Drop shadow

3, 3, 70, 3.00 Black
STEP 7
Change Foreground Colour to Pattern and look for your Gold Bead Pattern
Image add borders,
STEP 7
Change Foreground Colour to Pattern and look for your Gold Bead Pattern
Image add borders,

4, symmetric ticked, colour not in image Ok
Magic wand, select this small border
Magic wand, select this small border

Add Shift, RGB Value, Tolerance 12, Contiguous ticked, Feather 0 Anti-alias ticked, Outside
Flood fill with the GoldBeads pattern
Adjust sharpness, sharpen
Selections Invert
Effects, 3D effects, Cutout
Flood fill with the GoldBeads pattern
Adjust sharpness, sharpen
Selections Invert
Effects, 3D effects, Cutout

3, 3, 80, 20.00 Colour Black
Repeat Cutout, changing Vertical and Horizontal to -3 (minus)
Selections Select None.
STEP 8
Image Add borders,
Repeat Cutout, changing Vertical and Horizontal to -3 (minus)
Selections Select None.
STEP 8
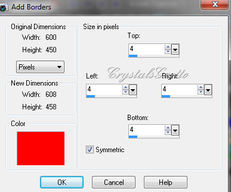
Image Add borders,
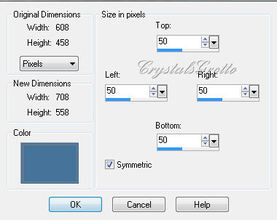
50, Symmetric ticked, colour #46739a
Select with magic wand, same settings as above,
Effects, EyeCandy5 Textures, Swirl
On the Basic tab, set settings to match mine
Select with magic wand, same settings as above,
Effects, EyeCandy5 Textures, Swirl
On the Basic tab, set settings to match mine
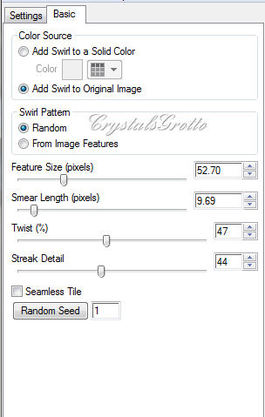
Add Swirl to Original Image ticked,
Swirl Pattern Random,
Feature Size, 52.70
Smear Length 9.69
Twist 47
Streak Detail 44
Load
Effects, Reflection Effects, Pattern
Swirl Pattern Random,
Feature Size, 52.70
Smear Length 9.69
Twist 47
Streak Detail 44
Load
Effects, Reflection Effects, Pattern
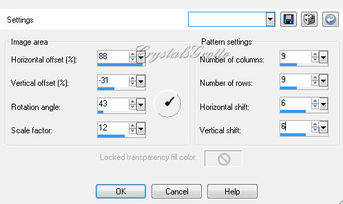
Horizontal Offset, 88
Vertical Offset, -31 (minus)
Rotation Angle, 43
Scale Factor, 12
Number of columns, 9
Number of rows, 9
Horizontal shift, 6
Vertical Shift, 6
OK
Selections Select None,
STEP 9
Image Add borders 4, Symmetric ticked, colour not in image, OK
Vertical Offset, -31 (minus)
Rotation Angle, 43
Scale Factor, 12
Number of columns, 9
Number of rows, 9
Horizontal shift, 6
Vertical Shift, 6
OK
Selections Select None,
STEP 9
Image Add borders 4, Symmetric ticked, colour not in image, OK
Magic Wand

Add (shift) RGB Value Tolerance 12, Contiguous ticked, Feather 0, Anti-alias ticked, Outside
Select this small border, Flood fill with GoldBeads Pattern,
Selections Select None.
STEP 9
Image Resize
Select this small border, Flood fill with GoldBeads Pattern,
Selections Select None.
STEP 9
Image Resize
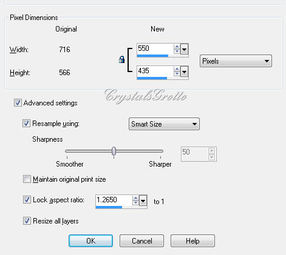
Width 550, Height will adjust automatically Resize all layers, Ticked
OK
Add your watermark as a new layer
Layers Merge, Merge All (Flatten)
OPTIONAL STEP Adjust Sharpness Sharpen
Save as JPEG
Hope you enjoyed this tutorial as much as I did writing it.
OK
Add your watermark as a new layer
Layers Merge, Merge All (Flatten)
OPTIONAL STEP Adjust Sharpness Sharpen
Save as JPEG
Hope you enjoyed this tutorial as much as I did writing it.
